Good Morning, we hope you are all well and having lots of fun
at home!
We have put together some fun activities for you and your children. As resources are limited at the minute we have tried to include a range
of activities which do not require lots of equipment! All the activities listed
are just suggestions you may like to try over the coming weeks.
Volcanoes
What you need:
- 10 ml of dish soap
- 100 ml of cold water
- 400 ml of white vinegar
- Food coloring
- Baking soda slurry (fill a cup about ½ with baking soda, then fill the rest of the way with water)
- Empty 2 liter soda bottle
Instructions:
NOTE: This should be done outside due to the mess.
- Combine the vinegar, water, dish soap and 2 drops of food coloring into the empty soda bottle.
- Use a spoon to mix the baking soda slurry until it is all a liquid.
- Eruption time! … Pour the baking soda slurry into the soda bottle quickly and step back!
The science:
A chemical reaction between vinegar and baking soda creates a gas called carbon dioxide. Carbon dioxide is the same type of gas used to make the carbonation in sodas. What happens if you shake up a soda? The gas gets very excited and tries to spread out. There is not enough room in the bottle for the gas to spread out so it leaves through the opening very quickly, causing an eruption!
Extra experiments:
1. Does the amount of vinegar change the eruption?
2. Does the amount of water change the eruption?
3. Does the amount of baking soda change the eruption?
2. Does the amount of water change the eruption?
3. Does the amount of baking soda change the eruption?

Water Art Work
What you need:
- Water
- Paint brush
Instructions:
All you have to do is dip the paintbrush in the water and start painting in the garden. This usually works best on paving slabs. It's a great way for children to practice their art skills without having to get messy. It may be a nice idea to get the children to practice painting 2D and 3D shapes, their favourite characters or writing their names.

Skittle Rainbows
As you may have seen or your children may have already made their own rainbow pictures to show their support for the NHS and Key Workers, we thought it would be nice to show you a different way to make a rainbow.
What you need:
- Skittles
- Water
- Plate
Instructions:
Place skittles round the side of a plate and pour water in the middle. As the water reaches the skittles you will see how to the colour starts to run from the skittles into the middle of the plate. The colours mix together to make a beautiful and tasty rainbow.

Play Dough
What you need:
- 3 cups of flour
- 1 ½ cups of salt
- 6 tspn cream of tartar
- 3 tbspn of oil
- 3 cups of water
Instructions:
*Children must be supervised*
- Dissolve salt in the water.
- Pour all ingredients into a large pot.
- Stir constantly over medium heat until a ball forms by pulling away from the sides.
- Knead the dough mixture until the texture matches play dough (1-2 minutes).
- Store in plastic container. Should last for at least 3 months.
You could also had food colouring and glitter to personalise your play dough.

Mouldy Apples
What you need:
- 1 apple cut into 4 equal pieces
- 4 containers
- Vinegar
- Salt Water
- Lemon Juice
Instructions:
- Put an apple piece in each container.
- Fill each container halfway with one of the liquids. Make sure the apple piece is covered in the liquid. The fourth apple and container is your control group, so don’t add anything to that one.
- Keep the jars in cool area for a week.
- Observe apples for rot, mold, and any other changes.
The science:
Bacteria loves to grow on things like fruit. When you put fruit in the refrigerator, the cold temperature slows down the process. However, in this experiment the fruit is exposed to room temperature. Salt is a natural preserver because it dehydrated the water from the apple, reducing the area where bacteria can grow and thrive. On the other hand, the lemon juice was a perfect playground for bacteria to play because of the sugar.
Extra Experiments:
- Add a fifth apple piece and put it in the fridge for the week.
- Do the same exact experiment as the original but instead conduct it all in the refrigerator and see if the results change.

Floating Boats
This experiment investigates which household materials are waterproof and would make the strongest boat.
What you need:
- Tinfoil
- Paper
- Card
- Any other material your child would like to investigate with
- coins
- Bath or sink
Instructions:
- First use the different materials to create boats. Discuss how you need to create a boat shape by manipulating the materials. Remember your boats need to be able to hold coins so it will need to have sides to keep the coins inside the boat.
- Once you have made the boats, test 1 boat at a time.
- Put the boat in water and start placing coins one at a time in the boat until it starts to sink or you can no longer fit anymore coins in.
- Next carry out the same investigation with the other boats you have made.
- Discuss which material makes the best boat and why.
- Think about which boat is the strongest and most waterproof.

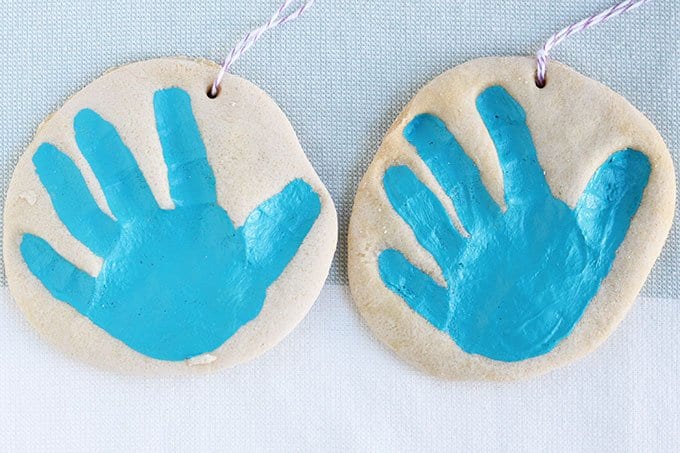
Salt Dough Hand prints
What you need:
- 1 cup of flour
- 1 cup of salt
- 1/2 cup of water
- Bowl
Instructions:
- Mix the salt and flour in a large bowl.
- Make a well in the salt/flour mixture and add the water.
- Knead until smooth and shape into a ball.
- Roll out the dough to your desired shape and press hand firmly into the dough.
- Bake in the oven between 60 minutes - 2 hours depending on the thickness of your dough.
- Once the ornament has dried you may like to paint your hand print.
- Alternatively you could make any ornament or fossil out of the salt dough instead of hand prints.
Balloon Pop! Not!
What you need:
- A Balloon
- 2 pieces of tape, each about 2 inches in length
- Small needle or push pin (with adult supervision)
Instructions:
- Blow up balloon.
- Use the the two pieces of tape to make an “X” on your balloon.
- Carefully (with parent supervision), push needle through the middle of your “X”.
- Leave needle in and see how long it takes your balloon to pop.
The science:
What causes a balloon to pop is called catastrophic crack propagation. This really complicated sounded phrase means that the hole in the balloon widening is what makes it pop, not the fact that air is slowly being let out. When the balloon’s hole gets bigger, it rips and eventually the balloon pops. In this experiment, the tape slow down this process.
Extra Experiments:
- Try blowing up the balloon in different sizes. Do the bigger, smaller, or medium sized balloons last the longest?
- Try using different kinds of balloons. Water, regular, skinny, round, etc. Which one works the best?
- Try doing it without the tape. What is the difference in time of it popping compared to the one with tape?

We hope you are your families have lots of fun, trying these different experiments!
Kind Regards,
The KS1 Team
No comments:
Post a Comment